Learn new useful tips using Photoshop
Tip 1 :Glow Effect
Change the lighting effect of any image using the Lighting filter.
 |
- Open an image on your canvas by clicking on File>Open, select the image you want to open and click on 'Open'.
- Click on Filter>Render>Lighting Effects . The Lighting Effects window opens, change only the Light type to 'Omni' let the other settings be the default. If you wish to, try changing the default values and check out the result effect.
 |
Disfigure/Distort an Image
- Open an image which you want to disfigure.
- Select Filter>Liquify. The Liquify window opens, a circular cursor with a plus sign appears. Drag this tool on your image and play around till you are satisfied with what you've done to the image. Then click OK.
 |
Stained Glass Effect
- Open an image on your canvas by clicking on File>Open and select the image you want to open, then click 'Open'. The effect looks good only on bitmap images, but you can try it out on photos too. The effect varies for different images.
- Click on Filter>Texture>Stained Glass the Stained Glass window appears, give the following properties : Cell size - 5, Border Thickness - 1, Light Intensity - 0. Then click on OK.
Ripple Effect
 |
- Open an image on your canvas.
- Click on Filter>Distort>Zigzag. The ZigZag window will open.
- Give the settings as follows : Amount - 6, Ridges - 14, Style - Pond Ripples and click OK. Here's your final image.
Tip 2 :Great Looking Textures
 |
Canvas Texture
- Open an image on your canvas by clicking on File>Open and selecting an image.
- Click on Filter>Texture>Texturizer. The Texturiser properties window appears.
- Give the following values : Texturizer, Texture - Canvas, Scaling - 75% , Relief - 9 , Light - top
- Click on OK.
 |
Glass Texture
- Open an image on your canvas by clicking on File>Open and selecting an image to open.
- Click on Filter>Distort> Glass. The Glass properties window appears. Give the following settings :Glass, Distortion - 9 , Smoothness - 4 , Texture - Canvas, Scaling - 100%
- Click on OK and check out your result.
 |
3D Pyramid Texture
- Open an image on your canvas by clicking on File>Open and browse for the image you want to open.
- Click on Filter>Stylize>Extrude. The Extrude window will open. Give the settings as follows : Type - pyramids Size - 15 Depth - 15, select Level Based, check Mask Incomplete Blocks.
 |
Tile Effect
- Open an image on your canvas by clicking on File>Open and browse for the image you want to open.
- Click on Filter>Stylize> Tiles. The Tile window will open. Give the settings as follows : Number of tiles - 5, Maximum offset - 5, select Background color.
- Here's your final result.
When you save images for the web using Photoshop.
After slicing your images, click on File/Save for web. The following screen will appear :
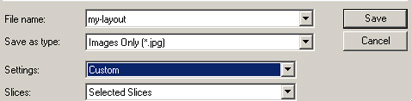
Save as type: Now the tip is: Choose Images Only.
Settings: Choose Other
The following screen will appear :

The next tip is:
Unclick the Put images in folder. This tip will help you avoid unnecessary creation of the image folder.
Slices: Choose selected slices.
Tip 4: Giving gradients to shapes.

- Select
 custom shape tool from the tools panel.
 - Click on the Shape drop down menu seen on the top toolbar.
- Click on the arrow and select Object.
- Select Fill pixels
 (third button seen in the tools panel in the left).
 - Look for the puzzle shape which is there and drag it to the canvas with the size you want.
- Click on magic wand tool
 and select the shape.
 - Create a gradient. Go to Paint Bucket Tool
 and click on the dropdown menu
- Select Gradient tool
 .
. - On the top panel the following panel will appear.

- Select Noise Samples from the dropdown menu of gradient tool and chose the gradient which has red gradient.
- Choose Mode as linear burn.
- Now click inside the shape and drag from top to down. Your shape with gradient is ready.

0 comments:
Post a Comment